Isn’t it great to receive high returns and e-mail subscribers with just a few dollars spent on Facebook?
Of course, it is, and in fact, it’s possible.
Gaining Facebook likes to grow your audience is indeed a wise move especially if you are just starting. However, entrepreneurs and marketers do one mistake, which you should avoid, that is, focusing too much on getting and improving Facebook likes without improving the conversions of their current audience.
You should remember: It’s not how many likes you bring, it’s how many likes you convert.
At the end of the day, most business owners judge their marketing performance on two things.
- How much they’ve spent
- How much they’ve earned
You see, getting 10% conversion from 1,000 fans is similar to getting 1% conversion from 10,000 fans. With those conversion rates, the generated revenue of the page with 1,000 fans is just equal to that of the page with 10,000 fans, provided that they have the same product pricing.
However, once the page that can convert 10% of its fans to customers reaches the like count same as that of the latter, the difference becomes huge.
Therefore, focus intently on converting your current audience no matter how big or small it is while continually growing your reach (because you still need to). Moreover, you can do this approach effectively through Facebook Ad remarketing.
This is a case study from my February campaign, which produced 500+ e-mail subscribers and 11,560% to 19,563% ROI from Facebook Ads within 15 days.
The following are some considerations and information about this case study:
- The website is an e-commerce store
- The targeted audience size is only 3,000 (you’ll learn more about this later)
- The marketing strategies used are Facebook remarketing and e-mail marketing
- The campaign only lasted for 15 days
We only spent $56.23 on this Facebook ad campaign. We then received the following:
- 500+ e-mail subscribers
- 22 conversions were tracked by the Facebook attribution model (13 from Google Analytics) from a $500 product price. Thus, the revenue produced ranged from $6,500 to $11,000.


Bad news: I may not be able to show you some of the exact screenshots (to protect some of the client data).
Good news: I created a similar layout that you can follow and I’ll tell you a step-by-step guide on how I did it.
Table of Contents
ToggleHow I increased our e-mail sign-ups by 47% and sales on Facebook by $56 within 15 Days
1. Create a Facebook Custom Audience
Whenever someone asks me to help with his/her Facebook marketing campaigns, the very first thing that I do is set up multiple custom audience data on his/her website.
To do this, you just need to go to your Facebook Ads Manager dashboard and find Audiences. From there, you need to create a Website Traffic Custom Audience.
Website Traffic Custom Audience is a list of people who visit your website or view specific pages.
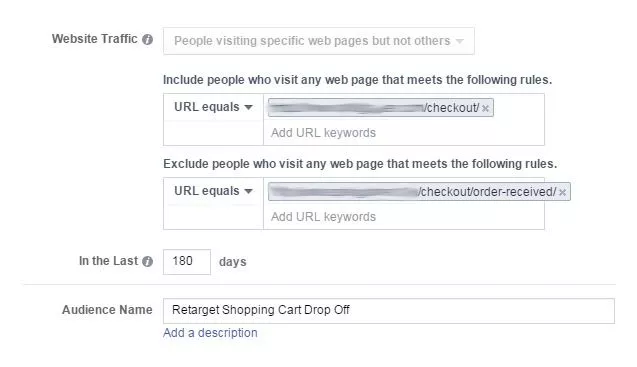
In this case study, the custom audience that I built is people visiting specific web pages but not others. To make it clear, I’ve set up a custom audience that targets people who visited the checkout page but didn’t successfully make a purchase.
Refer to the image below for how I set it up.

Once everything is set up, you need to copy the pixel code and paste it between the <head> and </head> in your website code. If you are running a WordPress site, you can usually see them on Header.php.
You may need to wait for a few days before the size is ready or enough to be used for paid advertising. This is one of the reasons why I’ve told you that it is the first thing that I do whenever someone asks me to help with their Facebook campaigns.
Anyway, are you done creating your custom audience?
Great! Let’s do another code implementation.
2. Install Conversion Tracking Pixel
Now, this one is different but also needs to be installed on your website. To set up a conversion tracking pixel, go to your Facebook Ads Manager dashboard and find Conversion Tracking.
From there, you may select the type of action you want to measure. The image below is an example of a tracking pixel created to measure checkouts.
![]()
Once done, view the pixel code and follow the instructions on how to install it. You just usually need to copy the code below and paste it into the webpage where you want to track conversions.
Considering the preceding example, I need to paste the pixel code on the final conversion page or the thank-you page since I would like to track the success orders.
You may know if you have installed the Facebook Conversion Tracking Pixel correctly once the status is set to Active. Once the status is active, I would like to congratulate you. You’ve done a great job! Now, let’s proceed.
3. Set up a Landing Page on Your Website
Given that I am not allowed to show you the exact landing page that I’ve set, I will tell you the main goals and steps we planned to use for our sales process:
- Increase e-mail subscribers by offering a special deal or coupon code
- Use e-mail to convert those subscribers into buying customers
For collecting e-mails, I suggest Aweber or Mailchimp, just because they rock.
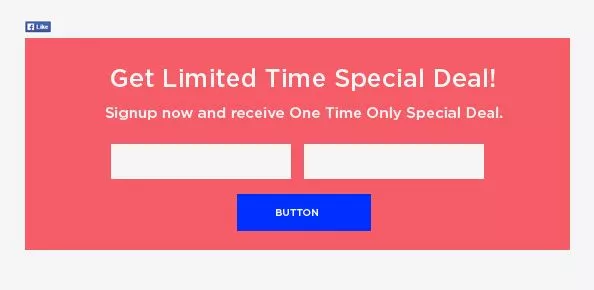
The landing page is very simple and doesn’t have lots of information on it. This landing page is just a straight-to-the-point page with a Facebook sharing button that looks like this.

Did it work? You bet!
You see, there are four common objections to purchasing. Two of these objections are price and urgency. Since I know that the solutions for the other common objections are already presented, I just need to determine a way to solve the things that aren’t present. And, that is the main reason for this landing page idea.
- To solve the price – offer a coupon code or discount.
- To solve urgency – make it limited.
Alright, I think that is enough, and let’s now do the real deal—creating a Facebook Ad copy for our remarketing campaign.
4. Create a Facebook Ad
At this point, you should have correctly installed the Conversion Tracking Pixel, and its status should be active. Your custom audience data are enough and ready to be used. Most importantly, you are done setting up the landing page that you will use for the campaign.
Now, it’s time to see results and make money.
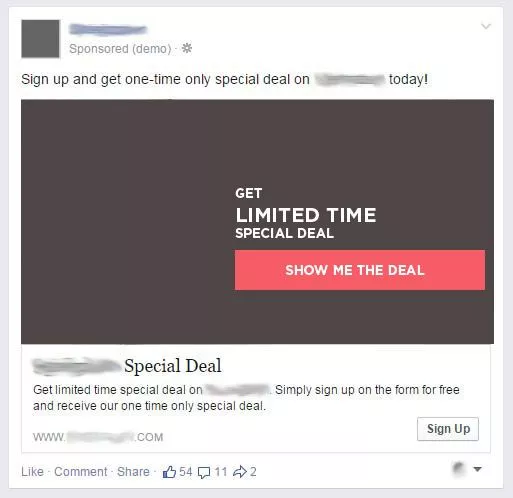
The ad that I created is called dark or unpublished sponsored posts. In case you are not familiar with it, it is a Facebook post that is not visible or publicly published on your Facebook Page. However, it will become available or visible to your target audience using Facebook Ads.
Again, I can’t show you the exact image so I’ve decided to blur the brand name and cover the real image (except the text and call to action that I’ve used).

The following are a few compositions that you will find on this copy:
- The post text is below 80 character counts.
Posts with 80 characters or less receive increased engagement by 66%.
- The ad copy has text and a button image design for an extra call to action.
- A call-to-action button, namely, the sign-up button, is added to the post.
Facebook currently allows you to choose one of the five call-to-action buttons: Shop Now, Learn More, Sign Up, Book Now, and Download. You can choose whichever you think fits your copy. I personally choose only between Learn More and Sign Up because they provide improved results on my campaigns.
What I love about sponsored posts is that they allow you to send people to your website and create a call-to-action button, and it has a Like Page button above your copy (if the targeted user is not yet connected to your page).
All in all, this single type of Facebook ad allows you to:
- Gain page likes
- Receive website traffic
- Gain website conversions
Yes, 3 in 1!
In case you don’t know how to create a dark or unpublished sponsored post, refer to this guide from Facebook. If their guide is too technical or confusing, just let me know and I’ll do my best to create a detailed guide for you.
Moving forward
So there you go! The four simple steps on how I drove $6,500 to $11,000 worth of sales and 500+ e-mail subscribers for a Facebook page for less than $60 within 15 days.
Have you tried targeting your website visitors and creating dark posts to retarget them? If you have not tried it yet, this is the perfect time to do it, and let me know the results that you’ll see.
Roel Manarang is a seasoned entrepreneur who helps businesses succeed through design and digital marketing. With over 10 years of experience, he has assisted 170+ global companies. Roel is the founder of Workroom, a digital marketing company, and Tycoon Philippines, an acclaimed business and finance blog. Find him on LinkedIn.


